[!WARNING]
This MCP Server is no longer being actively developed
We’ve shifted ongoing engineering investment to the built-in MCP Server included with Roblox Studio, which we recommend as the best way to connect external AI tools going forward.
This server’s source code and previous releases will remain available here for reference and existing workflows.
Quick Setup
- Download and Run the server: Windows or macOS
- Restart AI Client (Claude, Cursor, etc) and Roblox Studio
- Done!
Roblox Studio MCP Server
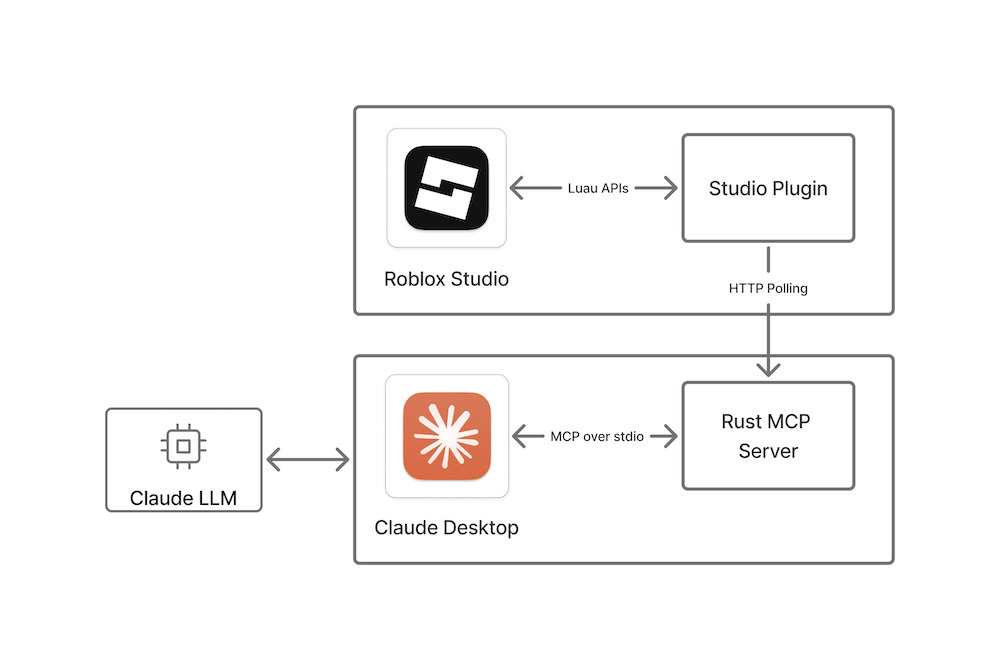
This repository contains a reference implementation of the Model Context Protocol (MCP) that enables
communication between Roblox Studio via a plugin and Claude Desktop or Cursor.
It consists of the following Rust-based components, which communicate through internal shared
objects.
- A web server built on
axum that a Studio plugin long polls.
- A
rmcp server that talks to Claude via stdio transport.
When LLM requests to run a tool, the plugin will get a request through the long polling and post a
response. It will cause responses to be sent to the Claude app.
Please note that this MCP server will be accessed by third-party tools, allowing them to modify
and read the contents of your opened place. Third-party data handling and privacy practices are
subject to their respective terms and conditions.
The setup process also contains a small plugin installation and Claude Desktop configuration script.
- run_code - Runs a command in Roblox Studio and returns the printed output. Can be used to both make changes and retrieve information.
- insert_model - Inserts a model from the Roblox Creator Store into the workspace. Returns the inserted model name.
- get_console_output - Gets the console output from Roblox Studio.
- start_stop_play - Starts or stops play mode or runs the server.
- run_script_in_play_mode - Runs a script in play mode and automatically stops play after the script finishes or times out. Returns structured output including logs, errors, and duration.
- get_studio_mode - Gets the current Studio mode (
start_play, run_server, or stop).
Setup
Install with release binaries
This MCP Server supports pretty much any MCP Client but will automatically set up only Claude Desktop and Cursor if found.
To set up automatically:
- Ensure you have Roblox Studio,
and Claude Desktop/Cursor installed and started at least once.
- Exit MCP Clients and Roblox Studio if they are running.
- Download and run the installer:
- Go to the releases page and
download the latest release for your platform.
- Unzip the downloaded file if necessary and run the installer.
- Restart Claude/Cursor and Roblox Studio if they are running.
Setting up manually
To set up manually add following to your MCP Client config:
{
  "mcpServers": {
    "Roblox_Studio": {
      "args": [
        "--stdio"
      ],
      "command": "Path-to-downloaded\\rbx-studio-mcp.exe"
    }
  }
}
On macOS the path would be something like "/Applications/RobloxStudioMCP.app/Contents/MacOS/rbx-studio-mcp" if you move the app to the Applications directory.
For Claude Desktop, go to Settings > Developer > Edit Config. This opens location of the claude_desktop_config.json.
Some clients require user to setup the mcp server manually for each project.
For example, Claude Code command would look like this:
claude mcp add --transport stdio Roblox_Studio -- '/Applications/RobloxStudioMCP.app/Contents/MacOS/rbx-studio-mcp' --stdio
Build from source
To build and install the MCP reference implementation from this repository's source code:
- Ensure you have Roblox Studio and
Claude Desktop installed and started at least once.
- Exit Claude and Roblox Studio if they are running.
- Install Rust.
- Download or clone this repository.
- Run the following command from the root of this repository.
cargo run
This command carries out the following actions:
- Builds the Rust MCP server app.
- Sets up Claude to communicate with the MCP server.
- Builds and installs the Studio plugin to communicate with the MCP server.
After the command completes, the Studio MCP Server is installed and ready for your prompts from
Claude Desktop.
Verify setup
To make sure everything is set up correctly, follow these steps:
- In Roblox Studio, click on the Plugins tab and verify that the MCP plugin appears. Clicking on
the icon toggles the MCP communication with Claude Desktop on and off, which you can verify in
the Roblox Studio console output.
- In the console, verify that
The MCP Studio plugin is ready for prompts. appears in the output.
Clicking on the plugin's icon toggles MCP communication with Claude Desktop on and off,
which you can also verify in the console output.
- Verify that Claude Desktop is correctly configured by clicking on the hammer icon for MCP tools
beneath the text field where you enter prompts. This should open a window with the list of
available Roblox Studio tools (
insert_model and run_code).
Note: You can fix common issues with setup by restarting Studio and Claude Desktop. Claude
sometimes is hidden in the system tray, so ensure you've exited it completely.
Send requests
- Open a place in Studio.
- Type a prompt in Claude Desktop and accept any permissions to communicate with Studio.
- Verify that the intended action is performed in Studio by checking the console, inspecting the
data model in Explorer, or visually confirming the desired changes occurred in your place.